Saturday, 28 November 2015

Limes in November?


NO  sun shining

NO  birds singing

NO  children playing and laughing

NO  vember


Don't remember the entire poem nor who penned this one but I liked it.


Anywho! Angela from Soscrappy proposed "LIME" as November's colour. 

Lime in November? Really? When everything is so brown, foggy and gray?!! AND WHY NOT? It sure perked up my spirit to work with something so cheery. Thanks Angela. It is a great one for November.


Remember this picture of my citrus bundle purchase? Probably not as it was over a year ago. 
 

Well I finally cut those lime fabrics to make my RSC blocks and also used the leftover from "Take 21".


Now comes the challenge, back-breaking sore knees exercices, headache, fun of deciding the layout lol.


 Some HSTs made for the border

 and so many more to make still!

Some fabric I ran out so no HSTs from them. Too bad. 


Now this being said, I don't think I will finish this quilt before December 31st. Meaning it's another UFO!! 

I had promised myself to work on my UFO list to bring it down to a "reasonable" size before starting something new. I guess I missed the point lol. Soooo, does this mean I won't participate in the RSC 2016?? Heck no! But as this year, I will pick only ONE block so only one quilt to add to my 2016 UFO list lol. 

BUT, I get ahead of myself because FIRST I want to hop over to So Scrappy and admire all the rainbow quilts made by some wonderful quilters. Hope to see you there too. 

Until next time .... 


;^)


Sunday, 22 November 2015

A finished & Hexies' Slow Stitching

Yes! Yes! Finally a finished. A small one but a finished nevertheless!


Cascadia, a quilt-along proposed by Lori from Humble Quilts is quilted, bind and all. Wwwelllll not quite!


 It still needs a label which is what I intend to slow stitch today.

It looks funny because the papers are still underneath the hexagons.


And then, some more hexies are waiting to be appliqued.  As I am slow stitching, I will pray for my friends in France and be thankful they are okay.

 (sideways pictures for some unknown reasons)


And then I will take a break with a cup of coffee and hop over to

Slow Sunday Stitches to see what others are working on.
Hope to catch you there.

Until next time ....

;^)

Wednesday, 18 November 2015

3D Bowtie Tutorial


I learned from a magazine how to made a 3D Bowtie and really liked the process. Made during the Winter of 2006/2007, my 3D Bowtie quilt is a scrappy flannel family favorite, especially on a cold, long Winter evening. Here's a few pictures.


Hugs & Kisses (2007)


Today, I would like to show you how to make a 3D Bowtie.


You will need 2 pieces of fabric for the background and 3 for the bow tie itself. The bow can be made of one colour or two, it's up to you.


To make the tutorial easier to follow, my bow tie has two colours. The knot is be green. All the pieces have to be the same size.  (Now, that's easy to remember.)  In this example, my pieces are 3.5 inches. 


Fold the "knot" piece in half, wrong sides together,


and place on one of the background piece and cover with one tie piece. Keep the folded edge in the middle. 


I have misaligned the pieces only to show you how to stack them. You will then sew the left edge. NOT the top edge. 

The piece will then look like this when opened. 

Next, you do the same with the other side. Sandwich the knot piece in between the background and the tie fabric of the top part of the block. 

Again, misaligned to show the order of the fabrics.

Side view before sewing
Sew the side edge,  NOT the top.
side view after sewing 

top view

Lay the background and tie pieces flat and it should look like the picture above.


Open the bowtie and place it as if it was finished. The knot piece will twist in the middle and it should look like the above picture.

side view.
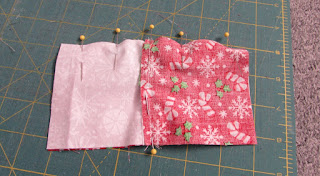
Now comes the time to pin all this. Open the knot piece so it is even on both sides of the middle seam. 

When I made my first 3D Bowtie quilt, I have learned a few lessons that I want to share with you. The first one is Pin, pin, pin! 


The second lesson is: do NOT sew the middle of the knot. Here's how to avoid this. 
This knot is not pinned properly. The crease is too close to the edge and might fall under the needle (above picture).

Here the knot fabric is more squared, keeping the crease away from the edge and the quarter-inch seam allowance. Perfect! (You have to pin the three layers together as in the picture below and not as this picture shows.)

The third lesson is more of a preference one. 
I sometimes find it is easier to align the side edges together if I pin the seams at the bottom too. (This is optional.)

You are now ready to sew across. It is thick and bumpy so sew with care. 

Open up and voilĂ ! A perfect 3D bow tie. 

Here's a candle mat I made with 3D bowties.  And now you can too.

Enjoy!

;^)


Saturday, 14 November 2015

Hexies, FMQ and Le Challenge

I don't have much to show you even though the title makes it sound like a lot. First, I made some hexagon flowers for the fun of it and some grew up to be pretty little mug rug


and decided to use them to practice my free motion quilting.

Doesn't show very well here, so let's try the back side.  I did pratice all the wonderful advises I got from my bloggy friends. (Thank you so much each and every one of you. It really help me become a better machine quilter. Thanks! ♥♥♥)


More hexies are still waiting to be finished.


Then, Le Challenge served us the word METHOD for this month and I jumped on it.
This is the back of my project (to show my nice FMQ.)


Sorry for blowing my own horn, but I am really proud of my FM star. A little shaky but still I love it ! The echo around the star was made with the help of a walking foot. Then, I FM'ed the stippling which turned out SOOOOOOOOO MUCH better than my very first try lol. (See here for pictures of my first stippling disaster.)


I did some wiggly trees in the corners. This one was made following the mark of a pencil.


My first tree was made without any help, just free hand and it looks like Charlie Brown's tree lol. Oh yes, this girl has to learn the hard way. See the tension? It isn't very good here but got better. Anywho my entry in this month Le Challenge is a  
3D Bowtie Candle Mat. 


The METHOD I used to piece this traditional block is quite simple and it produces a real puffed knot in the middle.


See how the scissors disappear under the knot?  Cool?  For those interested, I will post a tutorial how to make a 3D bowtie block. Stay tuned.

Okay one last picture of the FMQ.
It is not perfect, I will grant you that but for someone who only started FMQ last month, I am tickled pink with this one. Now, if you will excuse me I need to go back to my hexies so I can practice some more. I am having so much fun!  :^D

Until next time ....

;^)

Linking to Le Challenge for the Method
Linking to WIP's be Gone
On Sunday, I will link to Oh Scrap.
Hope you will take a moment to check out all the wonderful works posted on these blogs.


Friday, 6 November 2015

Sewing ... of course


Doing hexies because I can.


I do have a plan for most of them.

Until next time ....

;^)