I learned from a magazine how to made a 3D Bowtie and really liked the process. Made during the Winter of 2006/2007, my 3D Bowtie quilt is a scrappy flannel family favorite, especially on a cold, long Winter evening. Here's a few pictures.
 |
| Hugs & Kisses (2007) |
Today, I would like to show you how to make a 3D Bowtie.
You will need 2 pieces of fabric for the background and 3 for the bow tie itself. The bow can be made of one colour or two, it's up to you.
To make the tutorial easier to follow, my bow tie has two colours. The knot is be green. All the pieces have to be the same size. (Now, that's easy to remember.) In this example, my pieces are 3.5 inches.
Fold the "knot" piece in half, wrong sides together,
and place on one of the background piece and cover with one tie piece. Keep the folded edge in the middle.
I have misaligned the pieces only to show you how to stack them. You will then sew the left edge. NOT the top edge.
The piece will then look like this when opened.
Next, you do the same with the other side. Sandwich the knot piece in between the background and the tie fabric of the top part of the block.
Again, misaligned to show the order of the fabrics.
 |
| Side view before sewing |
 |
| side view after sewing |
 |
| top view |
Lay the background and tie pieces flat and it should look like the picture above.
Open the bowtie and place it as if it was finished. The knot piece will twist in the middle and it should look like the above picture.
 |
| side view. |
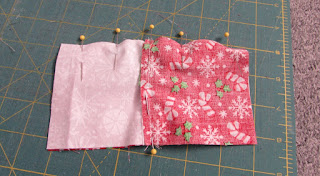
Now comes the time to pin all this. Open the knot piece so it is even on both sides of the middle seam.
When I made my first 3D Bowtie quilt, I have learned a few lessons that I want to share with you. The first one is Pin, pin, pin!
The second lesson is: do NOT sew the middle of the knot. Here's how to avoid this.
This knot is not pinned properly. The crease is too close to the edge and might fall under the needle (above picture).
Here the knot fabric is more squared, keeping the crease away from the edge and the quarter-inch seam allowance. Perfect! (You have to pin the three layers together as in the picture below and not as this picture shows.)
The third lesson is more of a preference one.
I sometimes find it is easier to align the side edges together if I pin the seams at the bottom too. (This is optional.)
You are now ready to sew across. It is thick and bumpy so sew with care.
Open up and voilà! A perfect 3D bow tie.
Enjoy!
;^)


9 comments:
What a lovely tutorial. I am going to try a block tomorrow morning (bedtime now). I love the candle mat you made. So sweet and I really like the effect of the 3D bowtie. Thanks Chantal.
Very clear tutorial - thanks! Those bows are adorable.
That flannel quilt looks really cuddly and warm - just the thing for these Northern winters.
Thank you Chantal - that all looks very clear. Another for the to do list! xx
What a wonderful tutorial! Thanks for sharing it.
Thankyou for sharing. In 2 weeks time I have been asked to show my group how to make the butterflies and I have directed them to your blog for further instructions!
Merci beaucoup pour ce super tuto !! Le résultat est génial et ton candle mat est superbe !!
Bises et bon week-end !
what a clever block and thanks for the tutorial..... the mat looks fantastic and the block is perfect for it...
Hugz
Thank you; you make it look so easy, Chantal! I think I'll be having a go at this soon too.
Superbe ce noeud en 3D ! Merci pour le tuto, je vais essayer ;)
Post a Comment